This Article is a complete step-by-step guide for “How to Create a Website”.
A website has the potential to generate a passive source of income. You just want to write a few pieces of content in your area of interest.
You can create a website on many platforms like WordPress, Wix, Zoomla, Hubspot, and many others.
But in this article, I have covered “How to create a secure WordPress website”.
The purpose of creating this article is to spread awareness about the security of WordPress websites.
Creating a WordPress website is fun.
Let’s dive in
Create Your Website with Bluehost
Contents
Steps to Create a WordPress Website
- Find Your Niche
- Register a Domain
- Purchase a Good Hosting Plan
- Connect the Domain with Hosting
- Install the WordPress
- Important WordPress Dashboard Settings
- Install a Light Weight Theme
- Astra Premium Customization
- Blocksy Free Theme Customization
- Install and Activate Highly Recommended Plugins
- Design and Upload a Logo from Canva
- Create Important Category and Pages
- Create Menu for Easy Navigation
- Start Publishing Your Articles
Find Your Niche
This is the most important step that you should be aware of.
Never start blogging without knowing your area of interest.
A Niche is nothing but an area of interest that someone likes reading and writing about.
For Example, I like reading and writing about Software and technologies.
Blogging is a long-term task that’s why finding the right niche is important.
Do not worry about the scope of your niche.
Almost every niche has the scope of blogging and affiliate marketing.
All you have to do is create unique and quality content that helps your readers.
Register a Domain
You can register an exact match keyword domain name of your niche.
But I never recommend registering exact match keyword domain name.
Such domain names may limit the potential of your blog because they are highly focused on a specific product or topic.
You should go for a general name that can broaden your area of blogging.
For Example, Instead of registering the domain name “AntivirusSecurity.com” Go for “SecurityEscape.com”.
Now it’s time to register the domain name
Purchase the Domain name and Hosting from the same platform.
This process may save you time.
I have discussed both the cases in this article
- Domain and Hosting From same Platform
- Domain and Hosting from Different Platforms
Purchase a Good Hosting Plan
What do you think when I talk about Good Hosting Plan?
When I say “Good Hosting plan” that means
I’m talking about
- The Storage Type
- Speed
- Server Location
- Up Time
- SSL Certificate
- Cost
- Customer Support
- Disc Space
- Migration Facility
- Money Back Guarantee
I have used almost every Hosting service. Now I have found the one-stop solution for all my requirements.
I mostly use two hosting services Hostgator and Namecheap.
But I think Hostgator is one of the best and Affordable Hosting Service Providers.
Let’s talk about the Offerings of Hostgator
The Storage Type
Hostgator offers high-speed SSD storage. The SSD storage of Hostgator is genuinely very fast.
Faster loading is one of the most important ranking factors.
Always choose SSD storage for the faster loading of the website.
Speed
The speed of loading of a hosting service depends on the two factors
- Type of storage
- Server location
SSD storage is much faster than HDD storage type.
For faster loading speed, select the nearest server location of your country.
Hostgator Offers a high loading speed because it has SSD storage and a broad network of Data Centers.
Server Location
Hostgator has a broad network of data centers all over the world.
Select the nearest data center location for a faster speed of loading of the website.
Up Time
The highest uptime and lowest downtime is sign of good hosting service.
Hostgator Guarantees 99.99% Uptime.
Which I can say is right.
I have never observed down server problem.
SSL Certificate
SSL certificate is one of the most important factors in the ranking and security of your website.
Google never ranks the website without an SSL certificate.
SSL certificate also prevents unauthorized access and cyber-attacks.
Hostgator offers a free SSL certificate with every hosting plan.
You do not need to pay any extra fees for an SSL certificate.
Cost
Hostgator offers three different affordable shared hosting plans
- Hatchling Plan
- Baby Plan (Recommended)
- Business Plan
The Hatchling plan offers the hosting service at just $2.75/ Month for 36 Months (Single Website)
The Baby Plan offers the hosting service at just $3.50/ Month for 36 Months (Unlimited Websites)
The Business Plan offers the hosting service at just $5.25/ Month for 36 Months (Unlimited Websites)
Customer Support
The best part of the Hostgator hosting service is its customer support.
Hostgator provides an Award-winning customer support service.
The response time of the Technical support Executive is amazing.
You can Mail, Chat, and call to get support.
Disc Space/ Bandwidth
Hostgator offers Unmetered Disc Space/ bandwidth.
You can upgrade your disc space/ bandwidth if required.
You may receive a mail if exceed the disc space usage.
They provide enough disc space or bandwidth to run a small website.
Migration Facility
If you want to migrate your website to Hostgator hosting, they provide a free migration facility.
Money-Back Guarantee
Hostgator offers a 45-day money-back guarantee if you are not satisfied.
45 days is a considerable amount of time, so you can observe their performance very well.
Free Domain for 1 Year
You can also register a free domain for the blog.
This domain is completely free for 1 year and included in each plan.
Now you have enough understanding about Hosting Services.
Let’s Purchase a domain name and hosting plan step by step.
Go to the Hostgator Website.

Click the button “Get Started”
Now choose the recommended “Baby Plan” and hit the button “Buy Now”.

If you do not have any domain name, go with “Register a Domain”
But if you have already a domain name that you want to use for this blog, go with “I already own this domain”.
Now put your domain name in the box.
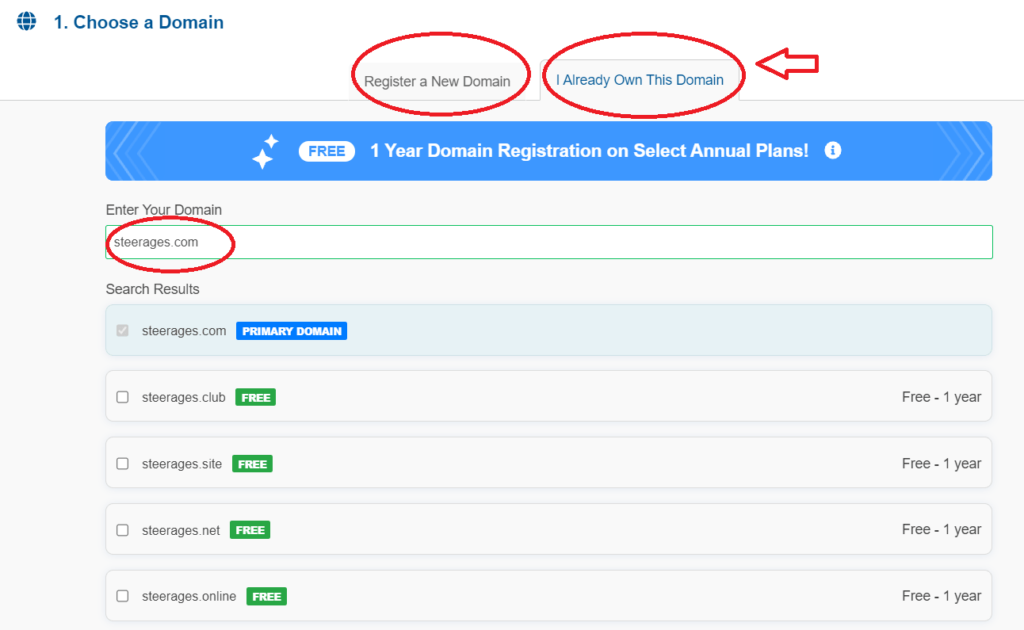
In the first case, you may need to check multiple domains for availability.
But in the second case just type your domain name and you are good to go.
Now it’s time to fill in the important details that are circled.

Fill in your Billing Info. You can either PayPal or a credit card.
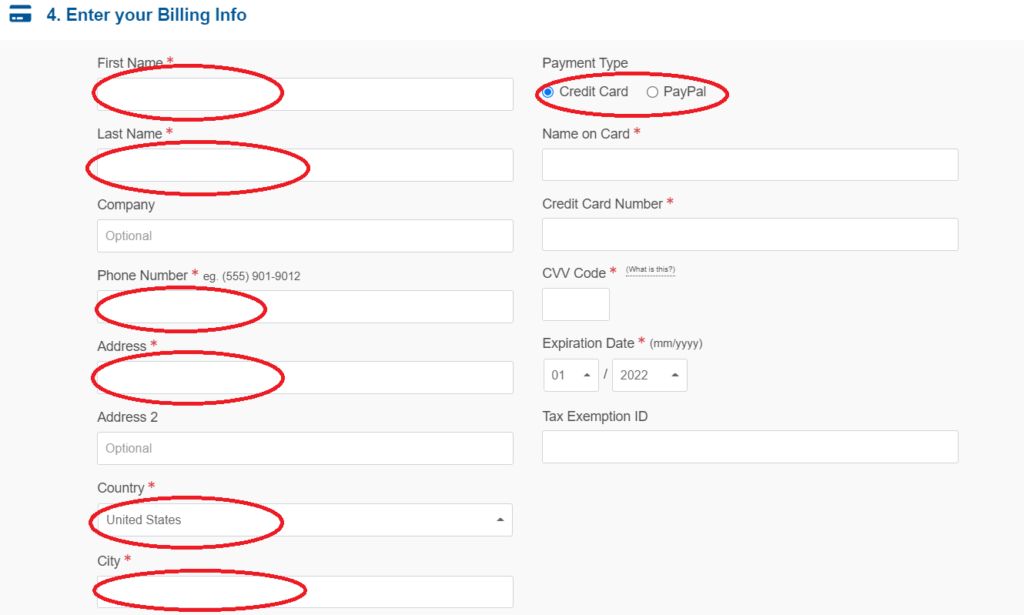
You can also opt for some additional services for more security.
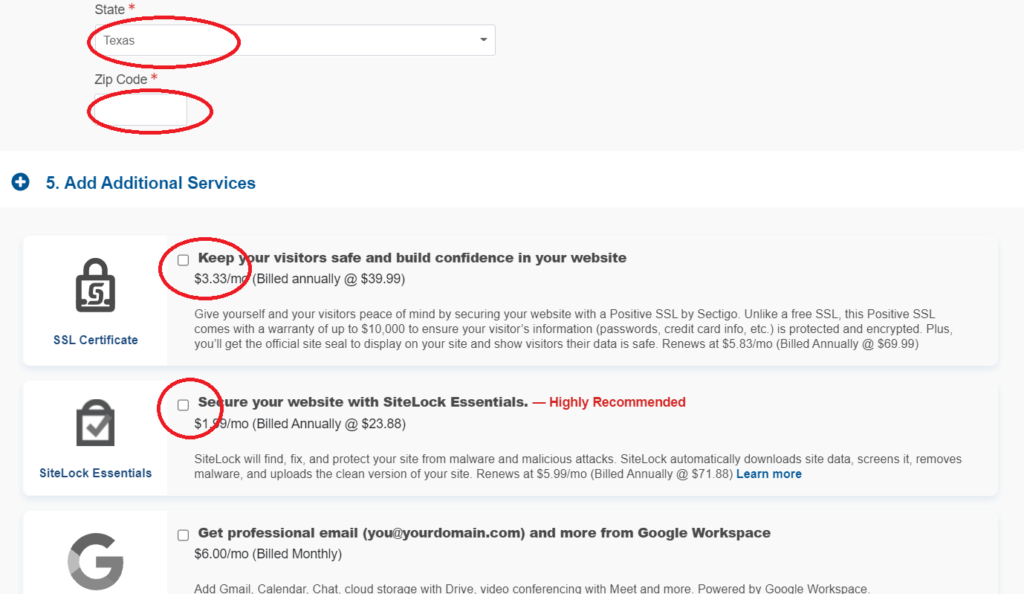
These services will add up an extra security layer to your dream website. It is totally optional.
Hostgator offers a free SSL certificate but you can also use Positive SSL for more security.
You can also opt Backup facility offered by Hostgator.
But if you don’t want to pay for this facility, I have suggested a free plugin further in this article that can fulfill your backup requirement.

Just keep reading!!
If you are finished with filling in all the details! Just hit Checkout and proceed.
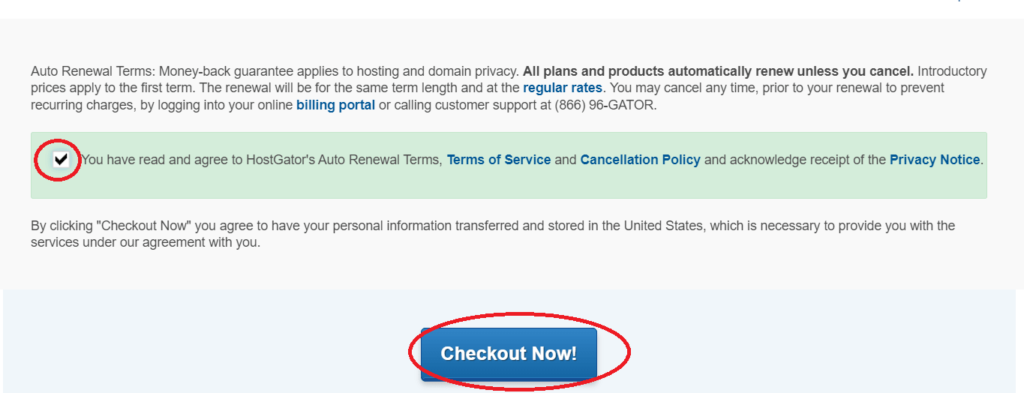
Pay the amount and you are done!
Let’s move to the next step.
Connect Domain with Hosting
If you have purchased the domain name from the same platform, avoid this step.
In another case, if you have purchased it from a different platform like Godaddy.
Follow these steps
Login to the Hostgator Account dashboard and click the “cPanel”.

Now search for the Primary and secondary nameservers on the right-hand side.
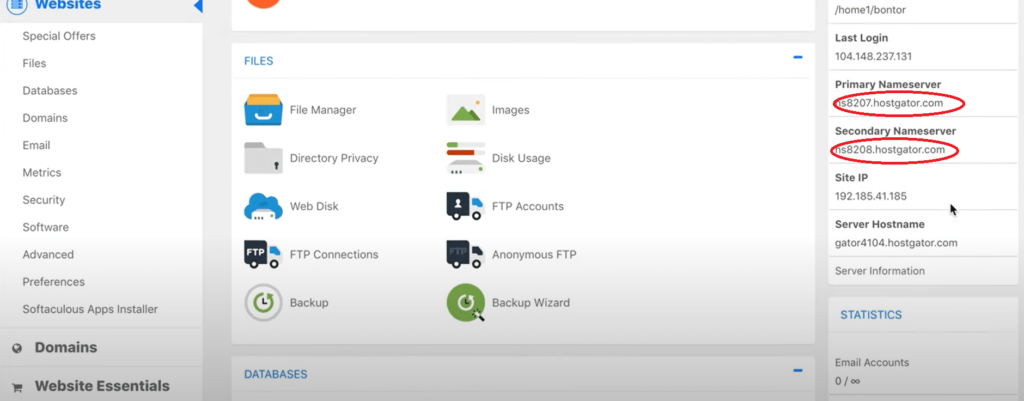
Login to your Domain Account, It is Godaddy in my case.
Go to manage Domains, now click “DNS”.

Scroll Down and Click “Change”.

Now click “Enter My Own Nameservers”.

Now copy and paste Primary nameserver from Hostgator to Nameserver1.
And Secondary nameserver from Hostgator to Nameserver2.
Click Save.
Remember, Nameserver may be different in your case.
Check your cPanel carefully.

Now tick the box and click Continue.

The last step is to add the domain to Hostgator Account. This step needs to be performed in both cases.
Now search for the Popular Links in the cPanel of Hostgator.
Click Addon Domain.

Now fill up the domain name like in the image below.
It’ll fetch other details automatically, no need to fill other boxes.
Click Add Domain.

And you are done. Now your Domain is connected with hosting.
Install The WordPress
It is very easy to install WordPress on a domain. Let’s do it.
Login to your Hostgator cPanel and scroll down to search for “Quick Install”.
Click the Quick Install.

Now select the WordPress box to continue.

Select your Domain from Drop down menu and click next.

Fill in the details and click Install.

Wait for Installation to complete. Now click Login to go to WordPress dashboard.

You can also log in to your WordPress dashboard by typing “yourdomain.com/wp-admin” in your browser.

Important WordPress Dashboard Settings
Find Settings on the left-hand side menu and click “General”.

Now select the time zone according to your country.

Scroll down to find the date format and select the Right date format according to your country.
Click Save Changes.

Find “Permalinks” in the Settings subMenu. Click Permalink
Now select “Post Name”, Click Save Changes.

Now you are done with Important WordPress Settings. Let’s move to the next step.
Install a Light Weight Theme
Theme is a very important component of a website. A Light Weight and SEO Optimized theme can Grow your website faster.
A lightweight theme loads faster that improves the Google ranking of your blogs and overall website.
The SEO Optimized theme is faster indexing and ranking.
These two themes are the best for any kind of blog or website.
Astra is a well-known theme and its Premium version is much better than any theme available in the market.
There are many limitations with Astra Free theme that’s why I recommend Astra Premium for Extreme flexibility.
So that you can design your Dream Blog/ website without any limitations.
Website Building Tutorial with Astra Theme
If you want to design your blog with a free theme, Blocksy Offers more flexibility than any other theme.
Although we can’t compare Blocksy with Astra it is the best theme in the Free Theme category.
The blocksy free theme offers a lot of features and flexibility than any free theme in the market.
Building Website with Blocksy Theme
Highly Recommended Plugins
- Loginizer
- Smush
- Yoast SEO
- Sucuri
- Akismet Anti-Spam
- W3 Total Cache
- Updraft Plus
These Plugins will provide Security and Speed to your Website.
Updraft is a free data backup plugin.
Design and Upload Logo from Canva
Canva is a free platform where you can design any type of logo for absolutely no cost.
Go to the Canva and design an attractive logo for your website.
Create Categories and Pages
Categories and Pages are also the SEO factors. Create appropriate categories, pages, and navigation before publishing any content.
Navigation is very important to guide your readers so that they can find the right content.
Create an easy Navigation menu.
Start Publishing Content
If you are done with all the steps mentioned above, now you can start publishing amazing content that helps your readers to gain knowledge.
Content is king!
So start publishing quality content and grow your website.
Final Words about “How to create Website”
This is an A to Z guide about “How to create Website”, just follow the steps and you can create a Pro-Website within a matter of time.
Website security is very important that’s why I have mentioned all the security measures which you can apply during website creation.
You can also add Cloudflare Security to your website. I’ll discuss this topic in another article.
What do you think about this article?